Battery switch on travel trailer function is crucial for managing your RV’s power. Understanding how it works is key to preventing electrical issues and maximizing battery life. This guide will walk you through the different types of battery switches, their wiring, troubleshooting, and essential safety precautions. We’ll cover everything from basic function to advanced configurations, ensuring you’re confident in maintaining your travel trailer’s electrical system.
This isn’t just about flipping a switch; it’s about understanding the delicate balance between your chassis battery (powering your engine) and your house batteries (powering your lights, appliances, and other onboard systems). We’ll explore how proper use and maintenance can prevent costly repairs and keep your adventures rolling smoothly.
Battery Switch Types in Travel Trailers
Choosing the right battery switch for your travel trailer is crucial for managing your power sources and preventing electrical issues. Different types offer varying levels of control and protection. Understanding their differences will help you select the best option for your needs.
Single-Pole Battery Switches
Single-pole switches are the simplest type. They offer a single on/off function, connecting or disconnecting one battery to the trailer’s electrical system. This is suitable for trailers with a single battery setup. They’re inexpensive and easy to install. However, they lack the flexibility of more advanced switches.
Double-Pole Battery Switches
Double-pole switches provide more control. They allow you to independently switch two batteries (like a house battery and a starting battery) on or off. This allows you to isolate the house battery while still having access to the starting battery for engine operation. This is a common choice for trailers with dual battery systems. While offering better control than single-pole switches, they still lack the ability to combine battery power sources.
Double-Pole Double-Throw (DPDT) Battery Switches
DPDT switches offer the most control and flexibility. They allow you to switch between two batteries independently, connect both batteries in parallel (combining their power), or completely disconnect both batteries from the trailer’s electrical system. This is ideal for maximizing battery life and power availability. They are more complex and expensive than simpler switches, but provide superior functionality for managing multiple battery banks.
Comparison of Battery Switch Types
| Feature | Single-Pole | Double-Pole | Double-Pole Double-Throw (DPDT) |
|---|---|---|---|
| Number of Batteries Controlled | One | Two | Two |
| Battery Combination | None | None | Parallel connection possible |
| Complete Disconnection | Yes | Yes (for each battery individually) | Yes (for both batteries simultaneously) |
| Complexity | Low | Medium | High |
| Cost | Low | Medium | High |
| Application | Single battery systems | Dual battery systems requiring independent switching | Dual battery systems requiring parallel connection and individual switching |
Function and Purpose of the Battery Switch

The battery switch in your travel trailer is a crucial component of its electrical system, acting as a central control for your batteries. It allows you to manage power flow, preventing unwanted battery drain and protecting sensitive electronics. Think of it as a master switch for your trailer’s power supply.The primary function of the battery switch is to selectively connect or disconnect your house batteries from the rest of the trailer’s electrical system.
So, you’re an audiophile who loves to travel? Awesome! Check out this guide on audiophile travel setups to make sure your music sounds amazing on the road. It’s all about portability without sacrificing quality. Then, if you’re taking your travel setup in a trailer, understanding the battery switch on travel trailer function is crucial for keeping your tunes going.
Knowing how to manage your power is key to a smooth trip – both for your music and other essentials!
This is essential for managing power and preventing problems.
Battery Isolation and Prevention of Battery Drain
The battery switch effectively isolates the house batteries (used for interior lights, appliances, etc.) from the chassis battery (which powers things like the engine and brakes). This isolation is vital. When you’re not using the trailer, switching off the house batteries prevents parasitic drain—a slow, constant drain of power even when nothing seems to be on. This parasitic drain is often caused by small electronics drawing power even when turned off (like clocks or sensors) and can completely drain your house batteries over time if left unattended.
By switching off the house batteries, you ensure they remain charged for your next trip. A fully discharged battery can be damaged and require replacement.
Protection of Sensitive Electronics
Another important function is protecting your sensitive electronics. By isolating the house batteries, the battery switch prevents surges or voltage fluctuations that might damage components. For example, if there’s a short circuit in the trailer’s wiring, the battery switch can help limit the damage by disconnecting the house batteries from the affected circuit. This protective measure is particularly useful for devices like your refrigerator, which are susceptible to voltage spikes.
Consider it an extra layer of safety for your investment in the trailer’s equipment.
Wiring and Connections of the Battery Switch
Properly wiring your travel trailer’s battery switch is crucial for safe and reliable power management. A correctly installed switch protects your batteries and electrical system from damage, allowing you to easily disconnect power when needed. Incorrect wiring can lead to short circuits, battery damage, and even fire hazards. This section details the typical wiring configuration and provides a step-by-step guide for safe installation.
The typical wiring setup involves connecting the battery switch between your batteries and the rest of your trailer’s electrical system, specifically the load center. This prevents power from flowing to the trailer’s appliances when the switch is off, effectively isolating the batteries. Understanding the different components and their respective connections is key to a successful installation.
Typical Wiring Diagram
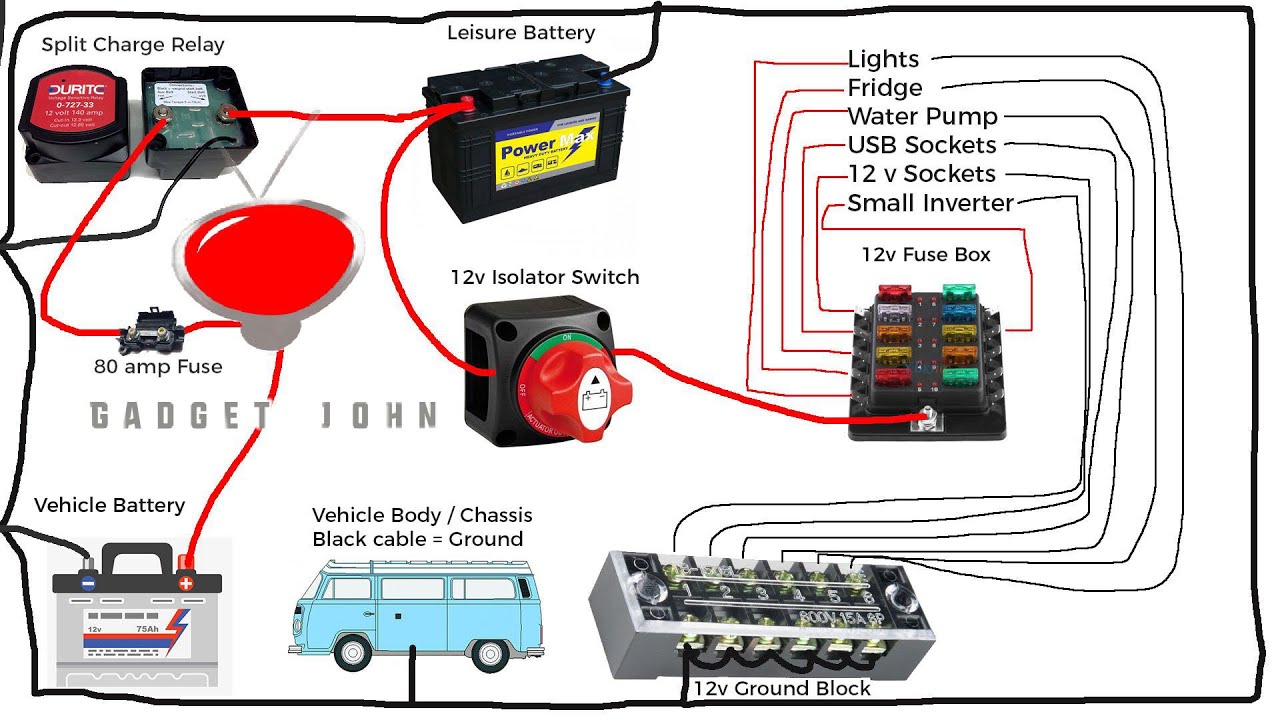
Imagine a simple diagram: Two heavy-gauge wires run from your battery’s positive (+) terminal to the battery switch. These wires should be appropriately sized for the amperage of your battery and charging system (check your battery and charger specifications for the correct gauge). The switch itself will have at least two output terminals, one connected to the positive input from the battery and another to the positive bus bar in your load center.
A separate heavy-gauge wire connects the negative (-) terminal of the battery directly to the chassis of the trailer (grounding). It is generally not routed through the battery switch.
Key Components and Connections
Let’s break down the essential parts and how they connect. The components include your batteries (typically two 12V deep-cycle batteries in parallel), the battery switch (usually a 1-2-both-off type), heavy-gauge wiring (appropriately sized for your system), and the load center (the distribution point for your trailer’s 12V circuits).
- Batteries: The positive (+) terminals of the batteries connect to the input terminals of the battery switch. The negative (-) terminals are connected directly to the trailer’s chassis ground.
- Battery Switch: The switch has input terminals for the battery’s positive (+) connection, and output terminals that connect to the load center’s positive bus bar. The switch’s positions determine which battery (or both, or neither) provides power to the trailer’s circuits.
- Load Center: The positive (+) output from the battery switch connects to the positive bus bar of the load center. This bus bar distributes power to the various circuits within your travel trailer.
- Wiring: Heavy-gauge wiring is essential to handle the current draw from the batteries and appliances. Use appropriately sized wire for both the positive and negative connections.
Step-by-Step Connection Guide
Following these steps will help ensure a safe and correct installation. Always disconnect your batteries before starting any electrical work.
- Disconnect Batteries: Completely disconnect both battery terminals (positive and negative) before starting any wiring.
- Secure Switch Mounting: Mount the battery switch securely in a readily accessible location. Ensure the switch is properly grounded.
- Connect Positive Battery Cables: Connect appropriately sized heavy-gauge wires from the positive (+) terminals of each battery to the input terminals of the battery switch. Use appropriately sized ring terminals for secure connections.
- Connect Positive Output Cable: Connect a heavy-gauge wire from the output terminal of the battery switch to the positive bus bar of the load center. Again, use ring terminals for a secure connection.
- Connect Negative Battery Cables: Connect appropriately sized heavy-gauge wires from the negative (-) terminal of each battery directly to a clean, bare metal point on the trailer’s chassis (ground). This ground connection should be separate from the battery switch.
- Test the Switch: Reconnect your batteries and carefully test the switch in each position (off, battery 1, battery 2, both). Ensure power flows correctly to the load center and your appliances in the desired positions.
- Secure Wiring: Ensure all wiring is properly secured and protected from chafing or damage.
Safety Precautions When Working with Battery Switches: Battery Switch On Travel Trailer Function
Working with batteries, especially in a travel trailer where space is often limited and conditions can be less than ideal, requires careful attention to safety. Ignoring proper procedures can lead to serious injury from electric shock, burns, or explosions. Always prioritize safety when handling your travel trailer’s battery system.Improper wiring or handling of the battery switch can create several hazards.
Incorrect connections can lead to short circuits, resulting in sparks, heat, and potentially a fire. Furthermore, working with a battery without taking appropriate precautions exposes you to the risk of acid burns from battery leakage and serious injury from electric shock. Even seemingly minor mistakes can have significant consequences.
Battery Disconnect Procedure
Before performing any work on the battery switch or related wiring, always disconnect the negative (-) battery terminal first. This prevents accidental shorts and protects you from electric shock. Use a wrench appropriate for the terminal size and carefully loosen the nut securing the cable clamp. Once the negative cable is disconnected, you can then safely disconnect the positive (+) terminal.
Remember, always reconnect the positive terminalbefore* the negative terminal when finished. This sequence minimizes the risk of accidental sparks or short circuits.
Personal Protective Equipment (PPE)
Working with batteries and electrical systems necessitates the use of appropriate personal protective equipment. This protects you from potential hazards.
- Safety Glasses: Protect your eyes from splashes of battery acid or flying debris.
- Gloves: Insulated gloves protect your hands from electric shock and acid burns. Rubber or nitrile gloves are suitable.
- Closed-toe Shoes: Protect your feet from dropped tools or accidental spills.
Essential Safety Tools
Having the right tools makes the job safer and easier. Improper tools can increase the risk of injury or damage.
- Wrench(es): Appropriate size(s) for the battery terminals and any nuts or bolts on the battery switch.
- Screwdrivers: Various sizes and types (Phillips and flathead) for working with the switch and its mounting.
- Multimeter: To verify that the power is disconnected before working on the system and to test the connections after reassembly.
- Cable Connectors/Crimpers: If replacing wires or connectors, ensure you have the correct tools to create secure connections.
- Baking Soda and Water: Keep a solution readily available to neutralize any battery acid spills.
Additional Safety Considerations
Always work in a well-ventilated area when working with batteries, as they emit hydrogen gas, which is flammable and explosive. Never smoke or use open flames near batteries. If you encounter any unexpected issues or feel unsure about any step of the process, consult a qualified electrician or RV technician. Remember, safety is paramount.
Battery Switch Maintenance and Replacement
Keeping your travel trailer’s battery switch in good working order is crucial for reliable power and safety. Regular maintenance prevents issues and extends the lifespan of the switch, avoiding costly and inconvenient breakdowns on the road. Neglecting maintenance can lead to corrosion, poor connections, and even complete failure, leaving you without power when you need it most.
Regular Maintenance Schedule
A simple maintenance schedule can significantly improve the longevity and performance of your battery switch. This involves regular visual inspections and cleaning to prevent the buildup of corrosion and dirt, which can hinder proper operation and create safety hazards.
So, you’re an audiophile who loves to travel? Awesome! Check out this guide on creating the perfect audiophile travel setup to ensure your tunes sound amazing wherever you go. Then, if you’re hitting the road in an RV, understanding the battery switch on travel trailer function is crucial for keeping your power up and your music playing.
Mastering both will make your adventures even better!
- Monthly Inspection: Visually inspect the switch for any signs of corrosion, loose connections, or damage to the wiring. Pay close attention to the terminals and the switch housing itself. Wipe away any visible dust or debris with a clean, dry cloth.
- Quarterly Cleaning: More thorough cleaning is recommended every three months. Use a wire brush or a battery terminal cleaner to remove any corrosion build-up from the terminals. Apply a corrosion inhibitor to the terminals after cleaning to prevent future corrosion. Ensure all connections are tight.
- Annual Thorough Inspection: Once a year, perform a complete inspection of the switch and its wiring. Check for any signs of wear and tear, loose connections, or damage to the insulation. If you find any problems, address them immediately.
Replacing a Faulty Battery Switch, Battery switch on travel trailer function
If your battery switch fails, replacing it is usually straightforward. However, it’s crucial to select a suitable replacement and follow proper safety procedures. Choosing the wrong switch can lead to incompatibility issues and potential safety risks.
Selecting a Replacement Battery Switch
When choosing a replacement, match the amperage rating of the new switch to the amperage rating of your existing switch. This ensures the switch can handle the current draw of your battery system. Also, ensure the new switch has the correct number of terminals to accommodate your wiring configuration. The physical dimensions should also be compatible with your existing installation.
Disconnecting and Reconnecting the Battery During Switch Maintenance or Replacement
Before performing any maintenance or replacement, always disconnect the battery to prevent accidental shocks or short circuits. This is a critical safety step that should never be skipped.
- Disconnect the Negative Terminal First: Always disconnect the negative (-) terminal of the battery first. This minimizes the risk of accidental short circuits. Use a wrench or socket to loosen the terminal nut and carefully remove the cable.
- Disconnect the Positive Terminal: After disconnecting the negative terminal, disconnect the positive (+) terminal in the same manner.
- Reconnect the Positive Terminal First: When reconnecting the battery, reverse the process. Connect the positive (+) terminal first.
- Reconnect the Negative Terminal: Finally, connect the negative (-) terminal.
Impact of Battery Switch Failure on Travel Trailer Systems
A malfunctioning battery switch in your travel trailer can have serious consequences, impacting everything from basic lighting to essential appliances. Understanding these potential problems is crucial for preventing costly repairs and ensuring your safety. Ignoring a faulty switch can lead to frustrating breakdowns and potentially dangerous situations while you’re on the road.A faulty battery switch can disrupt the flow of power to various systems in your RV, causing a range of issues.
The most immediate and obvious problem is the inability to power your appliances and lights. This can leave you in the dark and without access to essential amenities, especially problematic in remote locations. Beyond inconvenience, a malfunction can also lead to more serious problems like battery drain and damage to sensitive electronic components.
Consequences for Different Travel Trailer Systems
A failing battery switch can affect various systems differently. For instance, if the switch is stuck in the “off” position, your lights, water pump, refrigerator (if it runs on 12V DC), and other 12V appliances will simply not work. Conversely, if the switch is faulty and allows partial or intermittent contact, this can lead to inconsistent power delivery, causing flickering lights or intermittent operation of appliances.
In the worst-case scenario, a short circuit within the switch itself could damage the battery or other electrical components. Consider a situation where the switch fails while you’re using the water pump – you could be left without water for essential tasks such as washing dishes or brushing teeth.
Battery Drain and Component Damage
A common problem stemming from a faulty battery switch is excessive battery drain. A switch that doesn’t fully disconnect the battery from the trailer’s electrical system can cause a slow but steady drain, even when the trailer is not in use. This parasitic drain can eventually lead to a completely discharged battery, leaving you stranded and requiring a jump start or battery replacement.
Furthermore, inconsistent power delivery caused by a malfunctioning switch can also damage sensitive electronic components. This can lead to the failure of things like your control panel, converter, or even your refrigerator’s electronic control board, resulting in expensive repairs.
Safety Hazards Associated with a Malfunctioning Battery Switch
A malfunctioning battery switch presents several safety hazards. The most obvious risk is the potential for electrical shock. If the switch is faulty and creates an arcing or short circuit, it can expose live wires, posing a serious risk of injury. Moreover, a poorly functioning switch could lead to overheating, potentially causing a fire. This risk is amplified if the switch is improperly installed or if corrosion has damaged its internal components.
Remember that lead-acid batteries produce hydrogen gas, and a spark from a faulty switch could ignite this gas, leading to an explosion. Therefore, addressing any issues with your battery switch promptly is crucial for preventing these dangerous situations.
Different Battery Switch Configurations and Their Applications
Choosing the right battery switch for your travel trailer depends heavily on your power needs and the complexity of your electrical system. A simple setup might only require a basic switch, while a larger RV with multiple batteries and power-hungry appliances will benefit from a more sophisticated configuration. Let’s explore the various options available.
Different battery switch configurations cater to various power demands and battery setups in travel trailers. The choice depends on factors such as the number of batteries, the types of appliances used, and the desired level of control over power distribution. Configurations range from simple single-battery switches to complex multi-bank systems with integrated safety features.
Single Battery Switch Configurations
These are the simplest type of battery switches, ideal for travel trailers with a single 12V battery powering basic systems. They offer a simple on/off function for the battery, disconnecting it from the trailer’s electrical system when not in use. This helps prevent parasitic drain and improves battery life. These switches are typically inexpensive and easy to install.
Dual Battery Switch Configurations with Separate Banks
For travel trailers with two batteries (often a house battery and a starting battery), a dual battery switch with separate banks allows independent control over each battery. This setup is common, enabling you to isolate one battery while using the other, maximizing battery life and preventing cross-drain. You can charge each battery separately or use both for increased power capacity.
Multi-Bank Battery Switches
Larger travel trailers with more than two batteries, perhaps including solar or generator charging systems, benefit from multi-bank switches. These allow independent control over three or more battery banks. This level of control provides the flexibility to manage power from various sources and to isolate specific banks for maintenance or charging. Advanced multi-bank switches often incorporate features like combining battery banks for increased capacity.
Battery Switches with Integrated Fuses
Safety is paramount, and integrating fuses directly into the battery switch adds a crucial layer of protection. These switches combine the switching function with overcurrent protection, preventing damage to the wiring and components in case of a short circuit or overload. This is a highly recommended feature, enhancing safety and reliability. The fuse rating should be chosen to match the wire gauge and the maximum current draw of the connected circuits.
Comparison Table of Battery Switch Configurations
| Configuration | Number of Batteries | Applications | Advantages |
|---|---|---|---|
| Single Battery Switch | 1 | Small trailers with basic power needs | Simple, inexpensive, easy to install |
| Dual Battery Switch (Separate Banks) | 2 | Most travel trailers with house and starting batteries | Independent control of batteries, prevents cross-drain |
| Multi-Bank Battery Switch | 3+ | Large trailers with multiple batteries and power sources | Flexible control over multiple battery banks, allows for complex power management |
| Battery Switch with Integrated Fuses | 1+ | All travel trailers | Enhanced safety, overcurrent protection |
Mastering your travel trailer’s battery switch is a small step that can prevent major headaches down the road. By understanding the different switch types, proper wiring, and common troubleshooting techniques, you’ll be equipped to handle any electrical situation with confidence. Remember regular maintenance is key to keeping your system running smoothly and safely. Happy travels!
Quick FAQs
What happens if my battery switch fails?
A failed switch can lead to dead batteries, malfunctioning appliances, and potentially dangerous situations. You might experience no power to your house systems or even a complete electrical shutdown.
How often should I clean my battery switch terminals?
At least twice a year, or more often if you live in a humid climate or frequently use your trailer. Corrosion can significantly impact performance.
Can I use any type of battery switch in my travel trailer?
No, the correct switch type depends on your trailer’s electrical system and power demands. Consult your owner’s manual or a qualified RV technician for guidance.
How do I choose the right replacement battery switch?
Match the amperage rating of your existing switch, or slightly higher. Consider features like integrated fuses for added safety.
